Gulp is a powerful task runner, that when used correctly, can vastly improve your workflow, as well as producing sites that would otherwise be bloated, take a long time to build, and be stuck with old technologies. Before you start using Gulp, take note of the Google Page Speed Insights score for your site. Compare this to the value after you have implemented Gulp, and you will be amazed by what a few simple tasks can achieve.
If you have not already installed and become familiar with Gulp, read about how to get started first.
The following examples are in use on my site, and run each time I commit.
Note: A lot of the examples are based on a Jekyll site; this isn’t a requirement, Gulp can work with any site or framework, even non web apps, such as mobile apps.
Each task requires a couple of plugins, these can be installed using $ npm install [plugin-name] (sudo might be required).
Jekyll
My site is powered by Jekyll, and since Jekyll cleans the _site folder each time, it needs to be the first thing that runs. Running Jekyll is as simple as using the gulp-shell plugin:
var gulp = require('gulp'),
    shell = require('gulp-shell');

gulp.task('jekyll', function() {
  return gulp.src('index.html', { read: false })
    .pipe(shell([
      'jekyll build'
  ]));
});
$ gulp jekyll will then build your site.
HTML
When most people think of minifying and optimising sites, they often focus on the CSS and Javascript, but tend to forget about the HTML. The following task will minify all HTML, saving a few hundred kilobytes and decreasing the load times of your pages.
var gulp = require('gulp'),
    minifyHTML = require('gulp-minify-html');

gulp.task('html', ['jekyll'], function() {
    return gulp.src('_site/**/*.html')
        .pipe(minifyHTML({
            quotes: true
        }))
        .pipe(gulp.dest('_site/'));
});
CSS
It’s good practice to organise CSS (and especially SCSS) files into modules. In CSS however, when @imports are used, it increases the number of network requests and slows down page load times. Take a look at the next example:
var gulp = require('gulp'),
    sass = require('gulp-sass'),
    importCss = require('gulp-import-css'),
    autoprefixer = require('gulp-autoprefixer'),
    uncss = require('gulp-uncss'),
    minifyCss = require('gulp-minify-css'),
    rename = require('gulp-rename'),
    glob = require('glob');

gulp.task('css', ['jekyll'], function() {
   return gulp.src('css/style.scss')
       .pipe(sass())
       .pipe(importCss())
       .pipe(autoprefixer())
       .pipe(uncss({
           html: glob.sync("_site/**/*.html"),
           ignore: [
               'label.active',
               '.dark-mode',
               'span.tweet-time',
               /(#|\.)(is-)/,
               /(#|\.)(has-)/,
               /(#|\.)(js-)/
          ]
       }))
       .pipe(minifyCss({keepBreaks:false}))
       .pipe(rename('style.min.css'))
       .pipe(gulp.dest('_site/style/'));
});
Let’s break this down and explain each part.
- The main scss file
style.scssis passed in as the source, the contents are then piped into thesasstask, compiling the scss into regular css. - Next, the contents are passed into the
importCssfunction. SCSS pulls imported files into one file, however it ignores files that are hosted remotely, for example on a CDN,importCsstakes care of this. - Next,
autoprefixeris used. Autoprefixer adds vendor prefixes to the properties that need it. It also removes any prefixes for properties that are no longer needed, for example:
a {
  -webkit-border-radius: 5px;
          border-radius: 5px;
}
will be changed to:
a {
  border-radius: 5px;
}
but
a {
  display: flex;
}
will gain the following properties:
a {
  display: -webkit-box;
  display: -webkit-flex;
  display: -ms-flexbox;
  display: flex
}- The next plugin will not work as well on dynamic sites, and is only recommended for static sites.
Uncsswill compare the generated CSS file to all the HTML files in your site, if it detects that there are styles in the CSS that have no effect on the HTML, it will remove it. This plugin is highly recommended if you are using frameworks such as Bootstrap or Foundation, as it can save hundreds of kilobytes of redundant styling. Note: If you are applying styling to classes that are added dynamically, e.g. contained in an AJAX response, or added via JavaScript, you will need to manually set the class as being ignored, so that it is not accidentally removed.- Update: it was pointed out to me that if you follow the BEM principles of CSS, you could set an exception for
is-*andhas-*dynamic classes. As long as this was strictly used, the uncss task shouldn’t cause any issues. - Update 2: Nils provided a comment with the regex necessary for preventing these classes being removed, thanks! I’ve updated the example above, and added another case to prevent
js-*classes being removed, useful for hooking into JavaScript events.
- Update: it was pointed out to me that if you follow the BEM principles of CSS, you could set an exception for
- Finally, the CSS is minified and renamed to
style.min.css, once again making a significant difference to the file size.
JavaScript
Normally, Uglify JS is the defacto standard when minifying Javascript, however, a couple of weeks ago I came across Babel (previously known as 6to5) and JSPM.io. JSPM is a browser package management tool, it is built on top of the SystemJS spec in ES6 and can load modules from any endpoint including npm and github. What this means is that instead of having to download and maintain things like jQuery, or rely on a CDN, you can add it to your package.json and easily control what version you use.
I will cover JSPM in more detail soon, however here are the basics.
Install jspm with $ npm install jspm, and run $ jspm install jquery. Follow any prompts (select Babel as the Transpiler) and then create a basic file like so (js/myapp.js):
import $ from "jquery";

// Doc ready
$(function() {
    // Regular code
});
The following task will install up to date JSPM dependencies and then compile the file into a single, minified production ready script with source maps.
var gulp = require('gulp'),
    shell = require('gulp-shell');

gulp.task('javascript', ['jekyll'], function() {
    return gulp.src('js/myapp.js', { read: false })
        .pipe(shell([
          'jspm install'
        ]))
        .pipe(shell([
          'jspm bundle-sfx js/myapp _site/js/steve.js --minify --no-mangle'
        ]));
});
Bonus: Using Babel, you can use the upcoming features of ECMAScript 6 such as classes. I’ll cover this in more detail soon.
Images
Even though minifying Javascript and Stylesheets can shave off a few kilobytes, nothing compares to simply optimising images. Instead, this can save megabytes, the equivalent of removing massive frameworks like jQuery and Bootstrap.
var gulp = require('gulp'),
    imagemin = require('gulp-imagemin'),
    pngquant = require('imagemin-pngquant'),
    jpegtran = require('imagemin-jpegtran'),
    gifsicle = require('imagemin-gifsicle'),
    optipng = require('imagemin-optipng');

gulp.task('images', ['jekyll'], function () {
    return gulp.src('images/**')
        .pipe(imagemin({
            progressive: true,
            svgoPlugins: [{removeViewBox: false}],
            use: [pngquant(), jpegtran(), optipng(), gifsicle()]
        }))
        .pipe(gulp.dest('_site/images'));
});
The task above saves 65.1% - 10.34Mb on my site!
Deployment
Once everything has been compressed, minified, optimised and transpiled etc, Gulp can then deploy the site to a remote server. There are loads of options for this, but I prefer rsync. Rsync will compare the source files to the destination, and only copy the files that have changed. Additionally, it will compare the contents of the source and destination file, and only transfer the parts of the file that have changed. In comparison, FTP would simply re-upload the entire file.
var gulp = require('gulp'),
    rsync = require('gulp-rsync');

gulp.task('sync', function() {
    return gulp.src(['_site/**'])
        .pipe(rsync({
            root: '_site',
            hostname: '',
            username: '',
            destination: 'public_html',
            incremental: true,
            exclude: []
        }));
});
Don’t forget to add in your hostname and username. You will also need to add your password if you are not using a keyfile
Tying it all together
Rather than having to run each task manually, let’s run everything at once:
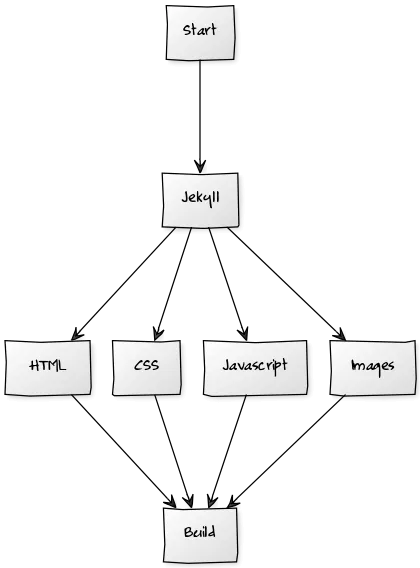
gulp.task('build', ['javascript', 'css', 'images', 'html']);When ran, the tasks will be executed like so:
SEO
The following task will run after the build task, it will send a request to Google and Bing, informing them that the site has been updated and that they should re-index the site.
var gulp = require('gulp'),
    request = require('request');

gulp.task('seo', ['build'], function(cb) {
    request('http://www.google.com/webmasters/tools/ping?sitemap={URL TO YOUR SITEMAP.XML}');
    request('http://www.bing.com/webmaster/ping.aspx?siteMap={URL TO YOUR SITEMAP.XML}');
    cb();
});
Testing
Anything can be plugged in to Gulp, especially with the gulp-shell plugin. The following optional tasks run tests on my site:
- PHPUnit
- CasperJS
- JSHint
- PHPSpec
Just because your site is now built and deployed, it doesn’t mean that it has to stop there! There are still loads more things that Gulp can be used for.
Once you have a solid gulp workflow in place, you will find that you no longer need to keep opening your FTP client each time you change your site. Just run gulp and have it upload a fully optimised version, with higher page speed insight scores! Next, think about using a continuous integration service like Travis-ci or Codeship to fully automate your workflow and run your gulpfile on each commit. This means you can commit from anywhere, including your phone!
If you would like a deeper insight into any of the tasks above, please leave a comment below.
